Visual Schedules 411
Visual schedules come in all shapes and sizes. The process of deciding which one to use begins with two questions:
- What is the purpose of this particular visual schedule?
- How will it be used?
Both of these drive the decisions you make about which format to use. If my primary purpose in making the visual schedule is to help a student become more independent in following the steps in a task, and I know the person is going to be seated at a desk while doing this, I may choose a horizontal layout that shows the sequence. Because it is a school-aged child and we are activity working on literacy skills, I consider a stationary format on the desk surface that has the student use a check-off system. Having the student cross out or check off the steps as they are completed, gives authentic practice with writing skills. On the other hand, if I am designing a schedule for a very active preschooler to use to transition throughout the day, I may want a portable system, such as a fabric strip that hooks onto his belt loop. Having the schedule on his body where we can easily access it without moving across the room, helps this little one cope with the stress of leaving one activity and moving on to another.
–
While there are no hard and fast rules, here are some things to consider.
- Horizontal Layouts: These work well when you are developing a schedule for a linear process, such as making a sandwich or planting seeds. The left-to-right sequence also supports literacy learning since, in most languages we read from left to right.
- Vertical Layouts: These work well for delineating separate activities, such as the things we will do in our therapy session or classes in a school day. The vertical format functions much like a ‘To Do’ list.
- Circular Layouts: Schedules that arrange the symbols in a clock-like fashion are less common but also very effective. By using a big pointer that swivels to point at one activity symbol at a time, it focuses attention on that particular event. Picture a big fat clock hand or spinner from a board game. We like this format for really young children who seem to ‘get’ the concept that the pointer means this is something we’re doing ‘now’.
- Ring Layout: This is really a kind of circular layout, in that the activity symbols are connected into one loop. Symbols are usually on cards that are attached through a ring (like you have in a 3-ring binder). The user flips through one activity symbol at a time; whichever one is showing up is what we’re doing now. This can be effective for kids who can only manage to look at one thing at a time. Also, because it is so portable and can hook onto a belt loop, it’s great for kids who need to have their schedules with them at all times. Our favorite use for it is by families who use this kind of schedule for car trips, and show the different locations and stops they are going to make (e.g., doctor’s office, drug store, post office, park). Having a visual representations of where you’re headed can help learners deal with what otherwise seems like a very unpredictable s
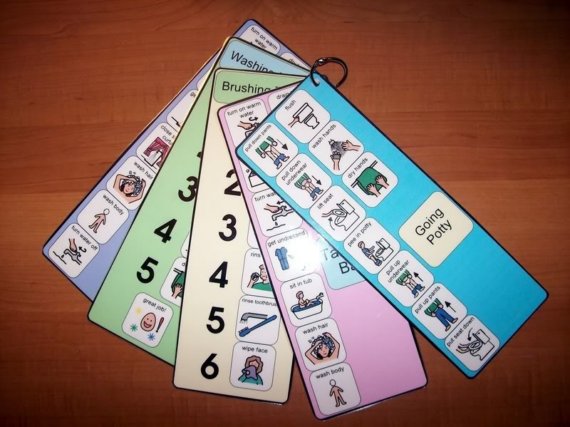 ituation.
–
Another thing that varies widely from schedule to schedule is how we represent that an activity or step is finished. Here are some of the options we’ve seen and/or used.
- Remove the symbol and:
- Put it in a pocket, envelope, or bin marked ‘finished’
- Put it on a parallel strip or special area marked ‘finished’
- Turn the activity symbol over to display the reverse side which shows a ‘finished’ symbol
- Use negation. Show that the activity is done by:
- Crossing the symbol off
- Making a mark in a check box
- Placing a ‘no’/‘not’ symbol (like a red X or red circle with a slash) on top when the activity is over
- Flip the card to a new one if it is on a ring, or turn the page if it is in a book
- Cover it up:
- Place a ‘finished’ symbol on top of the activity symbol
- Use a flap that folds over the activity symbol once it is over. Use a ‘finished’ symbol to indicate that the activity or step is complete.
–
–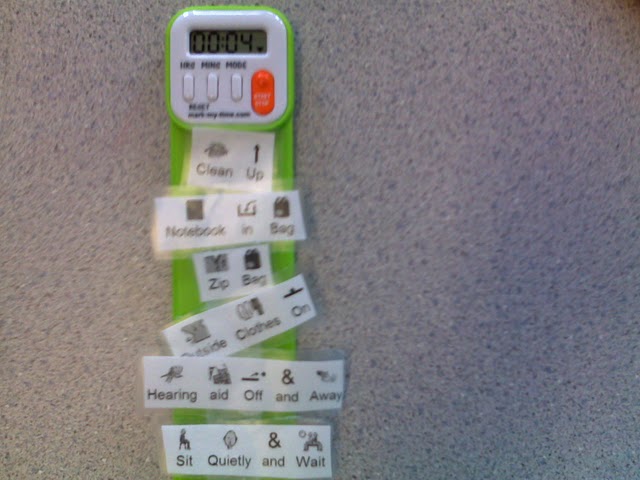 Here are some other tips that have made schedules more functional for our AAC friends.
1. Make it chunky: Some our our little ones have motor problems that make it a little hard to pick up a laminated symbol. We want the motor aspects to be easy, so we often put the symbols on thicker cardboard, foam, or foam core. The extra thickness and rigidity can make the symbols easier for little hands to grasp.
2. Put the schedule on the SGD or AAC app. Many AAC devices have built in templates for this. Some have advanced features, like automatic reminders that you can set up in schedules using the DV5.
3. Skip the velcro: We love velcro just as much as the next person but it can make things difficult for individuals with low tone. Try sticky tack or repositionable glue sticks. Or, if you just can’t let go of the velcro (no pun intended), try using a tiny bit rather than a full square/circle.
4. Keep it visible and accessible: Make sure that the schedule is someplace where the adults and the user can see it and get to it easily. We like the ones made from refrigerator magnets for use at home. Out of sight, out of mind, the saying goes, and that’s not what we need for visual schedules to work. They have to be used frequently and consistently so we try our best to put them out in the open, preferably in an uncluttered place at the learner’s eye level.
–
Another way in which we individualize the visual schedule relates to the symbols used to represent each activity or step. In general, the symbols on the schedule should be the same type of symbol used in the person’s other AAC. Object schedules, also called calendar boxes, are a great option for some kids, particularly those with low vision. If Karley is using an object communication board, then it makes sense to use object symbols for her schedule. If Tanner’s SGD has Minspeak symbols, then we’d use those for his schedule. And if Maribel is using an AAC app with SymbolStix, then those are what we use to represent the activities in her daily schedule.
–
In some situations, you may decide to deviate from that general rule. For example, Hayden is just beginning to use PCS symbols to make choices and request things like help, attention, and recurrence. We might opt to use photographs of the activities in his schedule since that concrete representation will allow him to make the connection between symbol and referent. He’s probably going to make the association of Reading Circle better if we symbolize the activity with photograph of our story time rug with his special chair than if we used a generic line drawing.
–
Next week, we’ll continue our discussion of visual schedules by looking at how to use different kinds of schedules with the same individual. Thanks for stopping by.
–
Filed under: Strategy of the Month
Tagged With: visual schedule
This post was written by Carole Zangari

1 Comment
Hello! I’ve been reading your web site for some time now and finally got the courage to go ahead and give you a shout out from
Kingwood Texas! Just wanted to mention keep up the good
job!