Using Vest Displays with Preschoolers on the Autism Spectrum
We’re so pleased to welcome back Dr. Carol Goossens’, an AAC pioneer who is an internationally-recognized consultant, SLP, and Special Educator from New York. Throughout her career, she has consulted extensively in a variety of classrooms serving the full spectrum of children with special needs. Dr. Goossens’ has presented both nationally and internationally about her collaborative work with teachers, therapists, and families. In today’s post, she shares a treasure trove of ideas on using wearable AAC. Learn more about her approach to using vest displays in this extensive post.
::::::::::::::::::::::::::::::::::::::::::::::::::::::::::::::::::
Using Vest Displays with Preschoolers on the Autism Spectrum
When working with students on the spectrum, we often struggle to gain and maintain their attention, especially during group activities such as Circle Time/Morning Meeting. The songs offered during Circle Time, however, create a great forum for working on a variety of communication skills, e.g., claiming a turn, announcing a song, choosing a song, choosing a verse, adding the chorus line (time-dependent repetitive line), adding a cause and effect sound effect (non time-dependent line), adding slot-filler/rhyming vocabulary elicited through the use of a simple ‘expectant pause’. You can also address a multitude of academic goals (e.g., colors, numbers, counting, matching) in keeping with your chosen early childhood curriculum.
Song Vest Displays can be used to supplement the Core + Fringe agenda that you may have already implemented during your Circle Time routine. You may be using the Core + Fringe Board to ‘set the stage’ for claiming a turn and choosing a song, but once that song is chosen there is a Vest Display to help children develop a deeper understanding of the vocabulary used when singing that song. When the song is finished, the Facilitator returns to the Core Facilitator board to comment on that song and ‘set the stage’ for the next song choice. For information on creating a low tech Core 48 Facilitator Board using a Staples Banner Format please refer to this blog post.
Figure 0: Core 48 Facilitator Board on Easel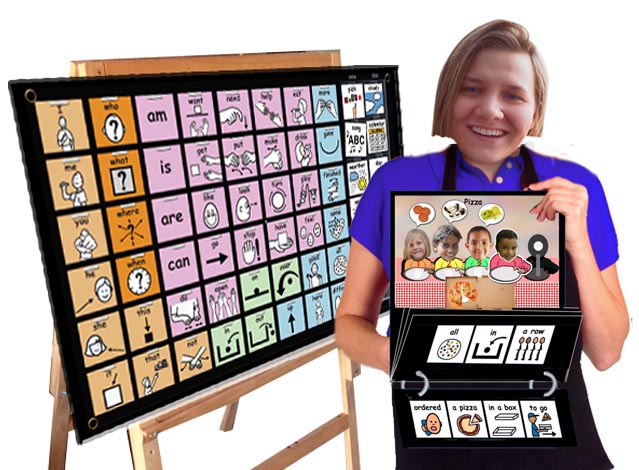
A Song Vest Display consists of a black base display (poster board: 14″ tall X 13″ wide) and several stacked black tiles (13″ X 5″) with symbol lines (3″ or 4″ symbols) that visually support the lyrics of the song.
Figure 1: Four Vest Displays
The stacked tiles are attached to the bottom of the base display with rings or a spiral binding and are held in place relative to each other via velcro. The base display incorporates a scene and uses manipulatives (either tangible objects or graphics) that can be attached/removed/moved within the scene. A Vest Display always has a little ‘siss boom baa’ built into the display … the star in Twinkle Twinkle Little Star spins and twinkles with glitter … the bus doors open and shut in the Wheels on the Bus … the spider slides up and down along an invisible monofilament line in Itsy Bitsy Spider … and the monkeys actually look like they’re jumping in 6 Little Monkeys Jumping on the Bed (the monkeys are velcroed on to a clear plastic rectangle that pivots on a brass fastener). Using a Vest Display is similar to singing a song or telling a story using a felt board but Vest Displays have the distinct advantage of offering a more robust AAC and literacy agenda.
Figure 2: Vest Displays with ‘Siss Boom Baa’
A Vest Display is typically worn by the Facilitator on a velcro-receptive vest/apron. (Example of an apron here.)
You can also ‘wear’ the Vest Display in a ‘necklace’ format. The ‘necklace’ can be made using grosgrain ribbon with a patch of loop velcro on each end that attaches to the hook velcro on the back of the Vest Display. When ‘wearing’ the display, your hands are free to manipulate materials and provide Aided Language Stimulation. The fact that the communication display is presented in direct line with the Facilitator’s, face provides a great ‘curb cut’ for nurturing joint attention skills.
Figure 3: Options for ‘Wearing’ Vest Display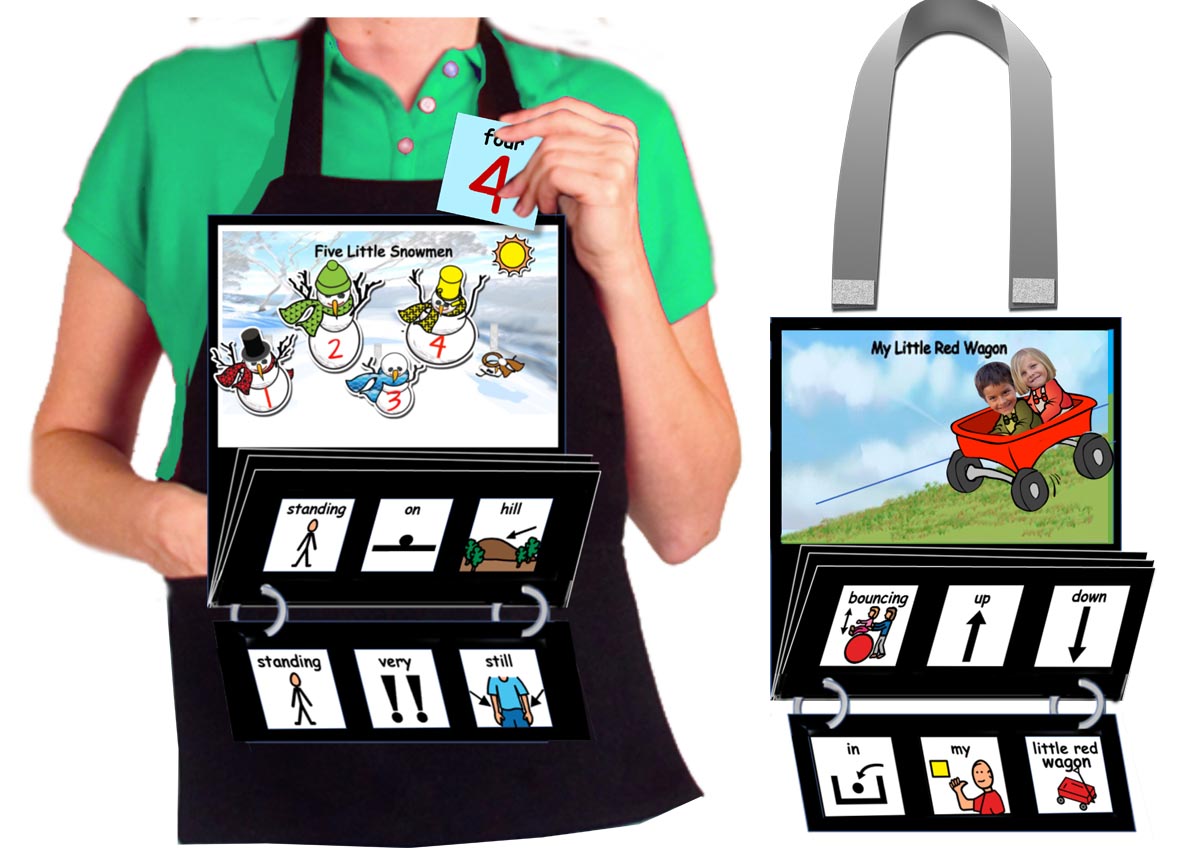
I’m especially fond of songs that offer a time-dependent repetitive line (chorus line) that can be programmed into a single message voice-output device (e.g., BIGmack). The programmed chorus line can be shared across students or can be assigned to an individual student.
Figure 4: Adding a Programmed Time-Dependent Repetitive Line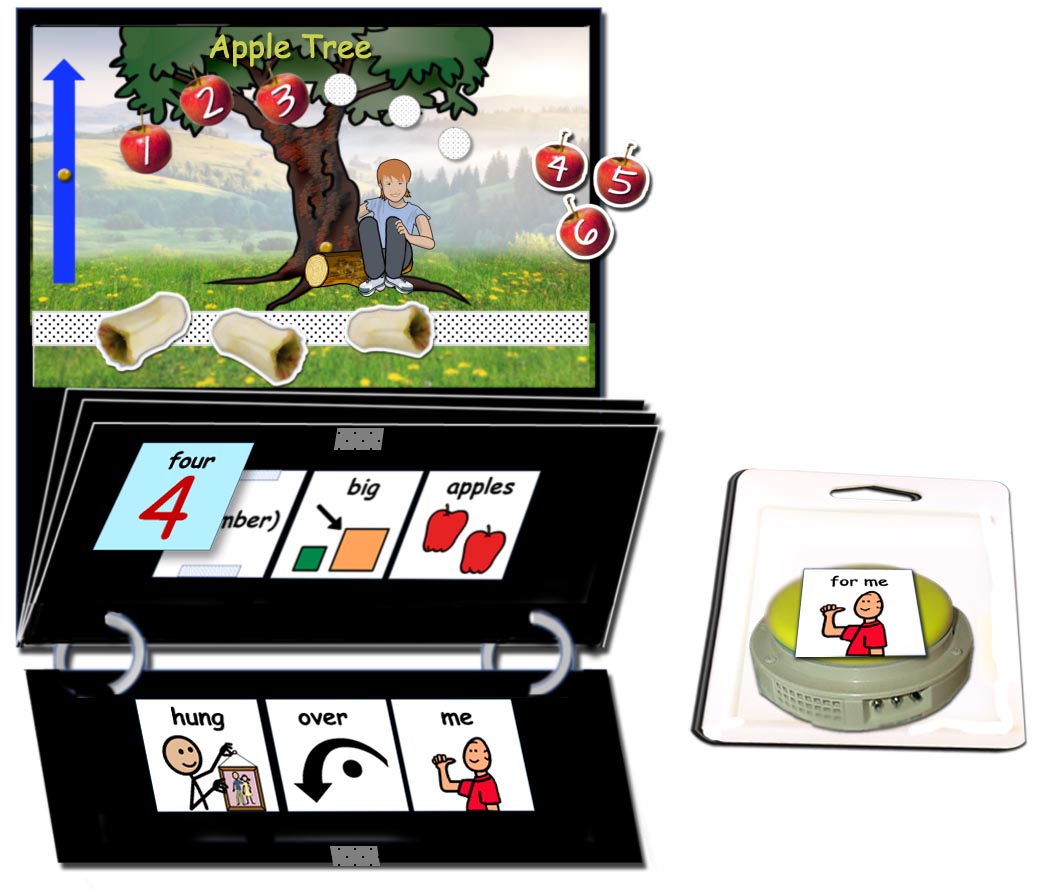
Some of the symbols in the symbol line can be constructed as detachable symbols. Slot-filler items are especially amenable to this treatment. In the song Old MacDonald, for example, the animals reflect a functional slot (e.g., “And ON that FARM he had a ________”.) I typically strive to depict the slot-filler and/or rhyming words as detachable Dual=Representation Symbols. Dual=Representation symbols are two-sided symbols that straddle two levels of representation. They can be either Picture Symbol=Photo or Picture Symbol=Printed Word. These back-to-back symbols allow you to tailor the lesson to the representational needs of each student. They also allow you to stimulate students with higher levels of visual representation. This year’s class might be using the Picture Symbol=Photo set of slot-filler items when singing the Down on Grandpa’s Farm Song; next year’s class might be better served using the Picture Symbol=Printed Word set allowing the teacher to add a greater literacy agenda. ‘Mystery word’ cards can also be added to Dual=Rep symbols to implement a phonemic awareness agenda. “Oh look our mystery animal starts with the ‘h’ sound. What do you think? …The hen? Let’s see … (flip the symbol to reveal the picture symbol of the mystery animal). You were right! It is the hen. H-hen starts with the ‘h’ sound! Let’s sing about the hen”. For more information on Creating Dual=Representation Symbols, please check out this blog post.
Figure 5: Incorporating Dual=Representation Symbols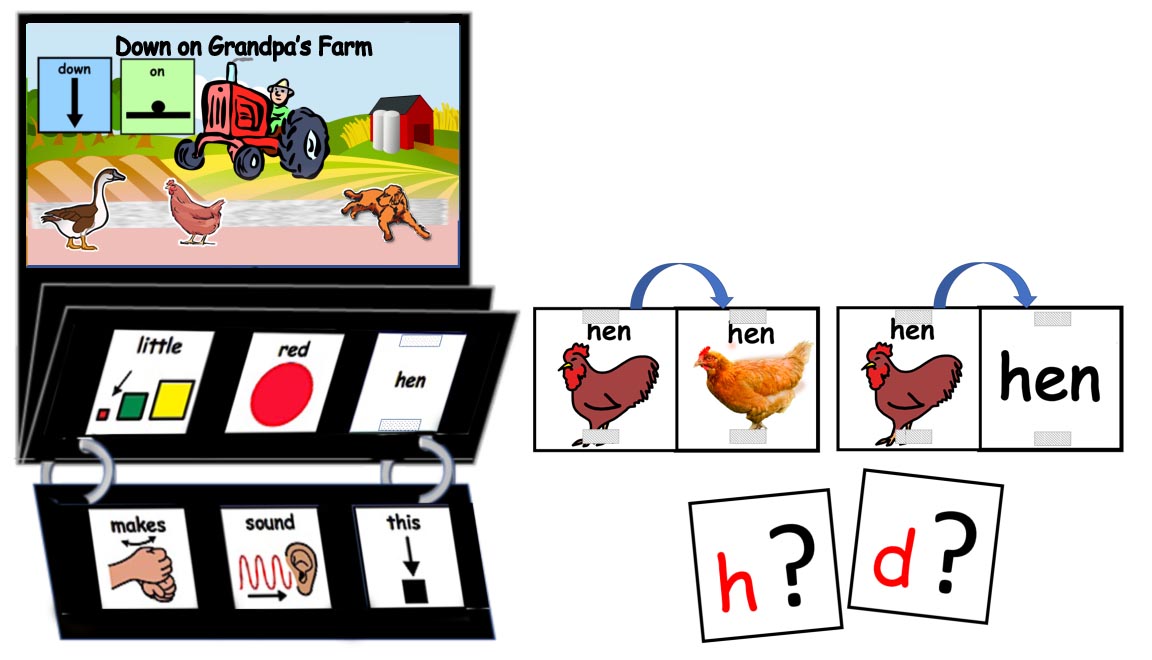
Although I’ve used the Vest Display format for several years, I have only recently discovered the benefits of using PowerPoint as my design tool. When the materials are developed using a template, Vest Displays can be created quickly and with greater consistency across staff within a school/agency.
Figure 6: Using PowerPoint as a Design Tool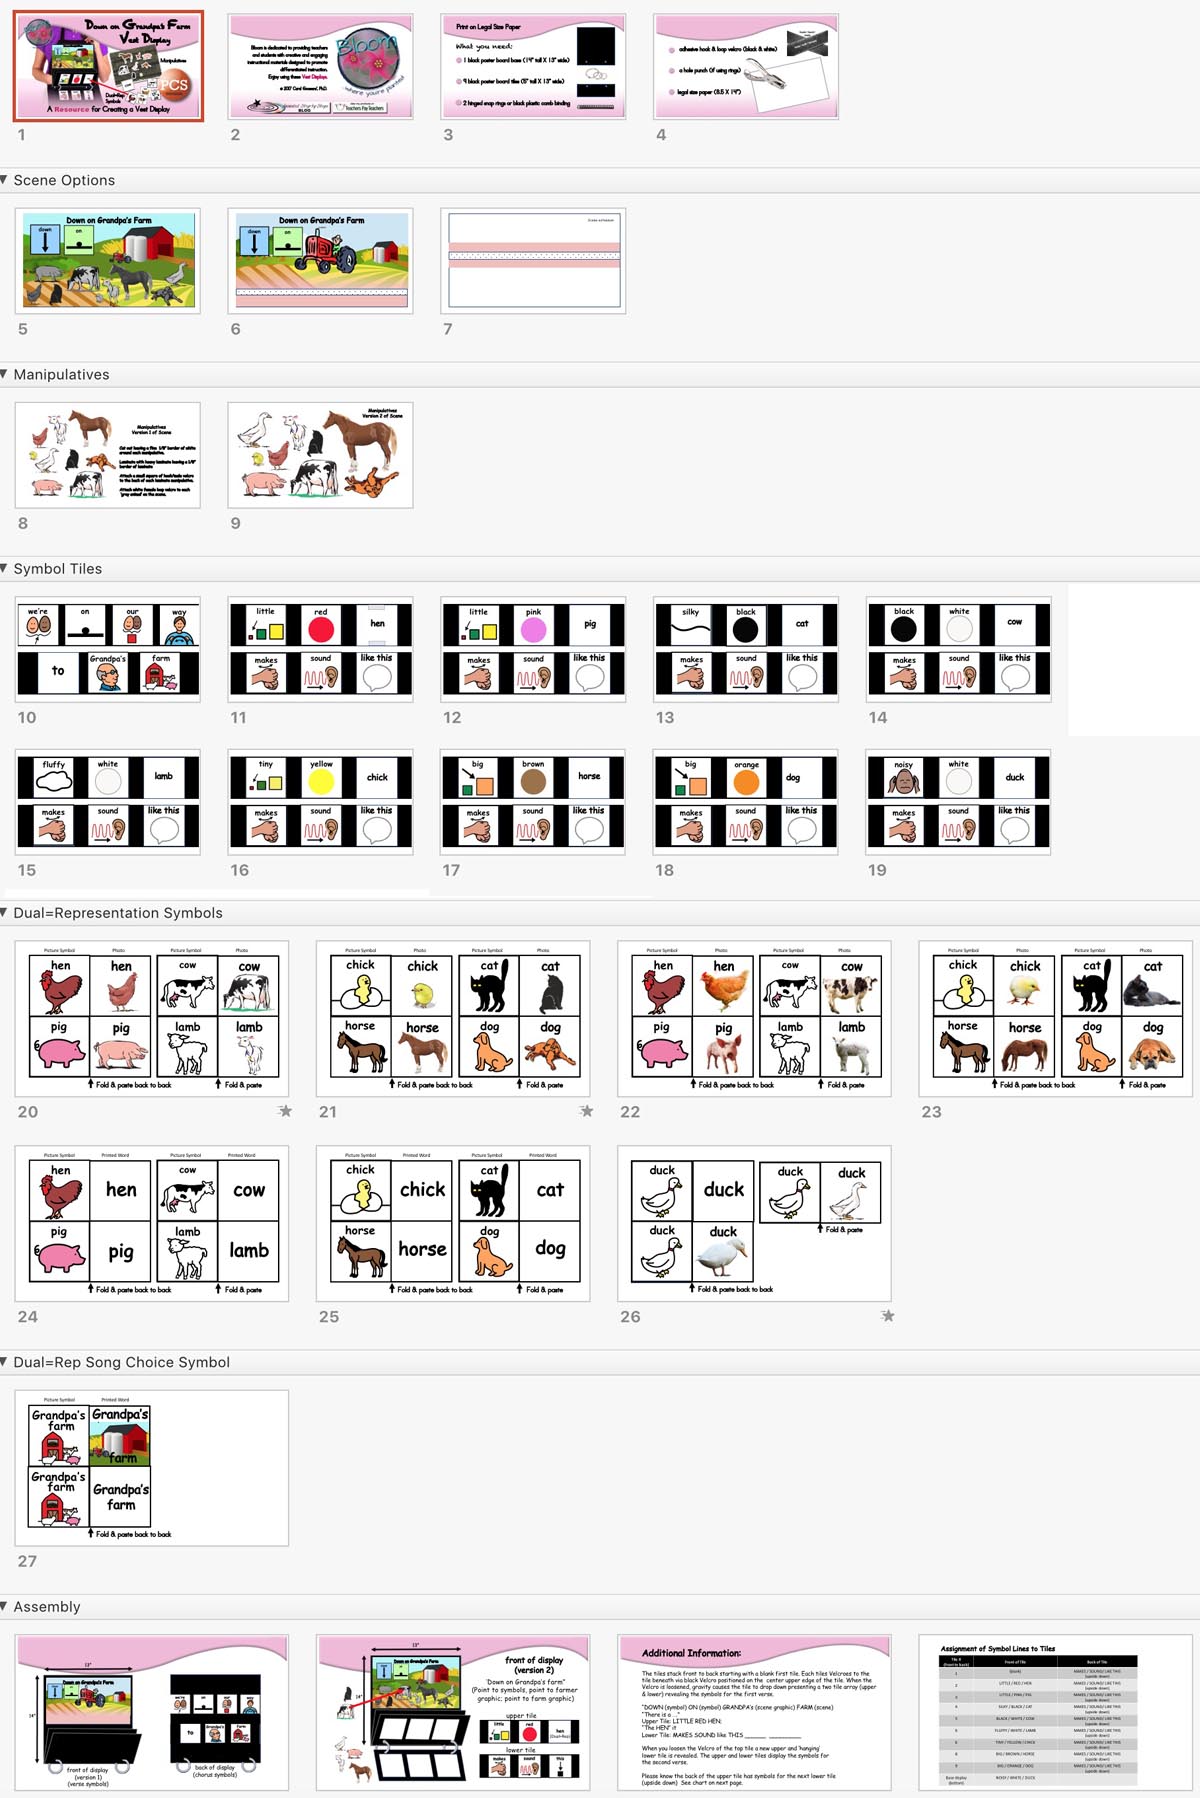
PowerPoint set to widescreen is the perfect page setup for creating the scene and symbol lines. The completed Vest Display is printed on legal size paper. Symbol lines (3″ and sometimes 4″ symbols; three or four symbols per line with black between) are designed as a single unit to minimize the need to cut and meticulously place individual symbols on the tiles. When adding symbols lines to the stacked tiles always start at the top of the stack allowing gravity to assist you when moving through the tiles.
Figure 7: Adding Symbol Lines to Tiles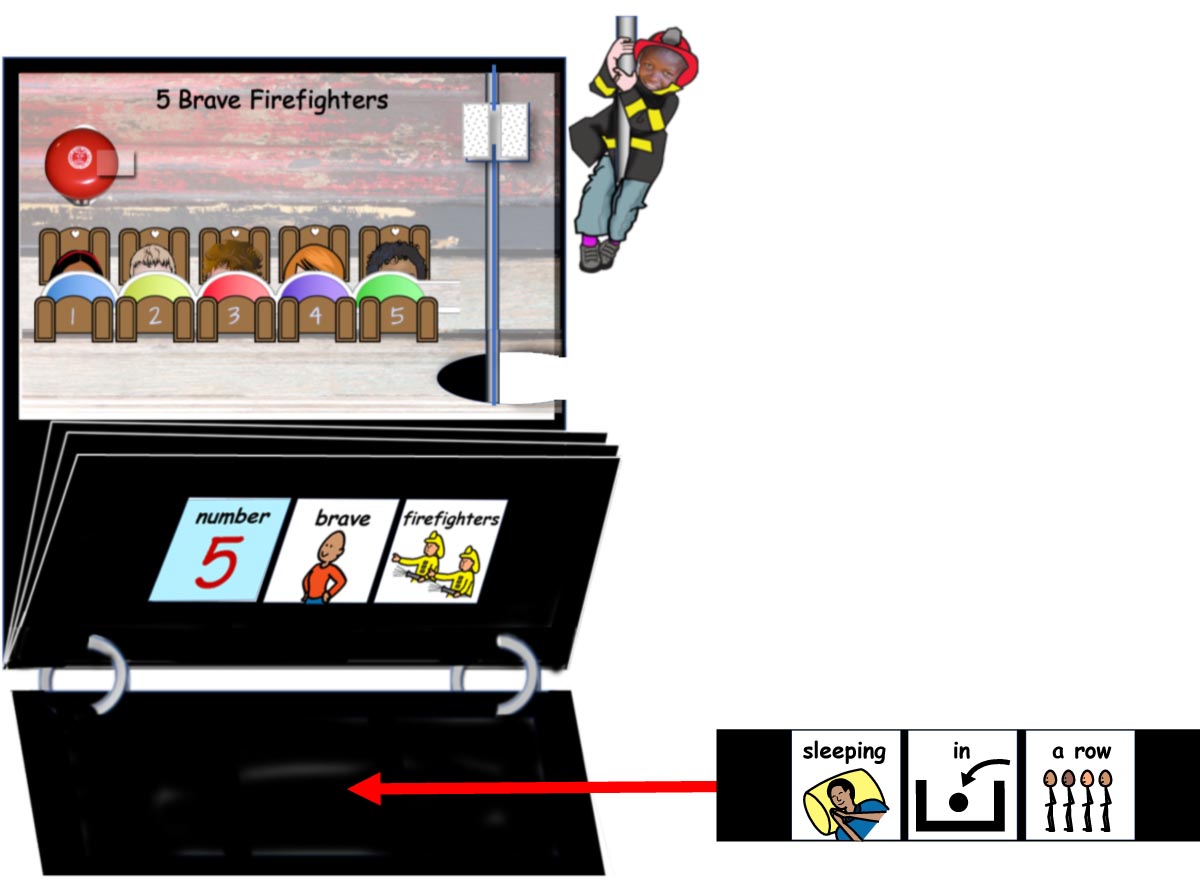
When cutting out the manipulatives, I always leave a 1/8” border of white to enhance their figure-ground differential (attempting to circumvent possible visual perception issues). Dual=Representation Symbols are always cut leaving a 1/8″ border of laminate to ensure the back-to-back symbols do not split apart. Ideally, your materials should last for at least five years … hopefully longer!
Figure 8: Preparing Manipulatives and Dual=Rep Symbols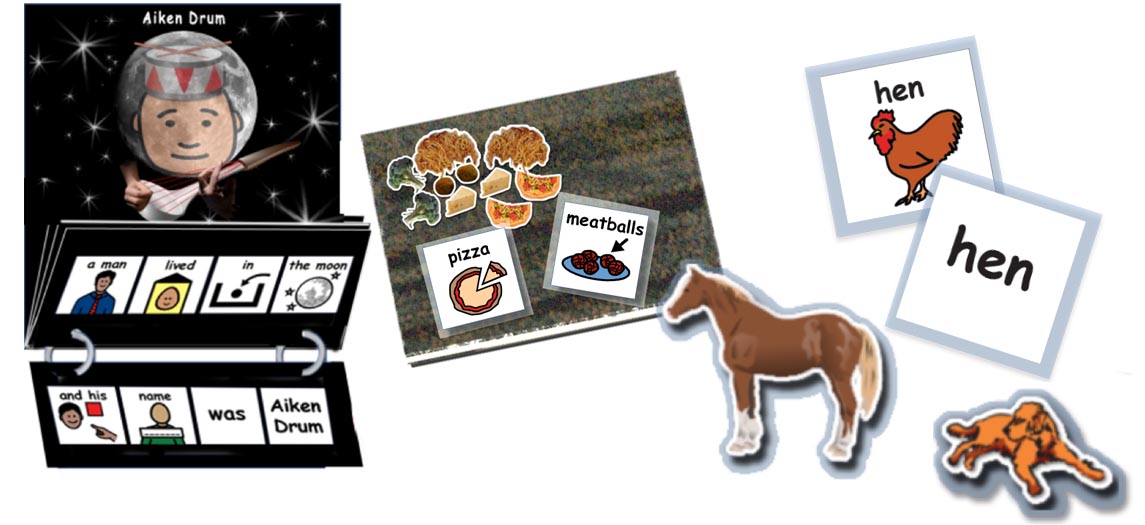
When possible, I try to incorporate student photo faces into the design. The presence of student photo faces enhances student engagement. A 3″ size is a good starting point for many displays although smaller sizes can be created depending upon need. Mary Wore Her Red Dress uses 3″ photo faces; 6 Little Kiddies jumping on the Bed (a variation of 6 Little Monkeys) uses a set of smaller photo faces e.g. 1.25″tall.
Figure 9: Incorporating Student Photo Faces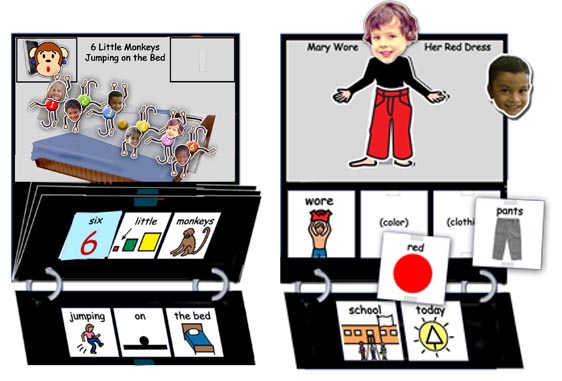
Although some classrooms may have a large library of Song Vest Displays, I usually encourage teachers to work with a set of eight songs for a block of time (e.g., 2-4 weeks). During any given Circle Time they may be singing only two or three of these 8 songs, but they are selecting from a larger pool of eight. This allows time for the children to develop favorites while providing them with sufficient time to advance their communication skills. When it’s time to change to a new set, I usually ‘retain’ four songs and ‘replace’ four songs (“something old and something new”). For children on the spectrum, this strategy periodically infuses new content into the mix, while retaining some ‘familiar territory’ despite a change in the song set.
In addition to a robust communication agenda, Vest Displays should also support your curriculum. Preschool programs often use a theme- or project-based approach, so some songs should reflect your ongoing agenda, e.g., when doing a unit on Community Helpers you might introduce the song, 5 Brave Fire Fighters. If you’ve structured your program to address Core words, consider selecting songs that address that goal, e.g., the core word STOP is repetitively used throughout the Get Up and Dance song; the core words WHERE and WHO are repetitively used throughout the Birdie, Birdie Where’s Your Egg chant?
Given the amount of materials being juggled when using Vest Displays, it is imperative that materials be organized in a way that promotes their seamless use during Circle Time. If your manipulation of materials looks like its work … it’s probably not therapeutic. Consider the following strategies:
Organizing the Vest Displays
Vest Displays can be organized in a wooden book display, a dairy milk crate or alphabetized legal-size hanging folders inserted into a rolling file folder cart.
Figure 10: Organizing Vest Displays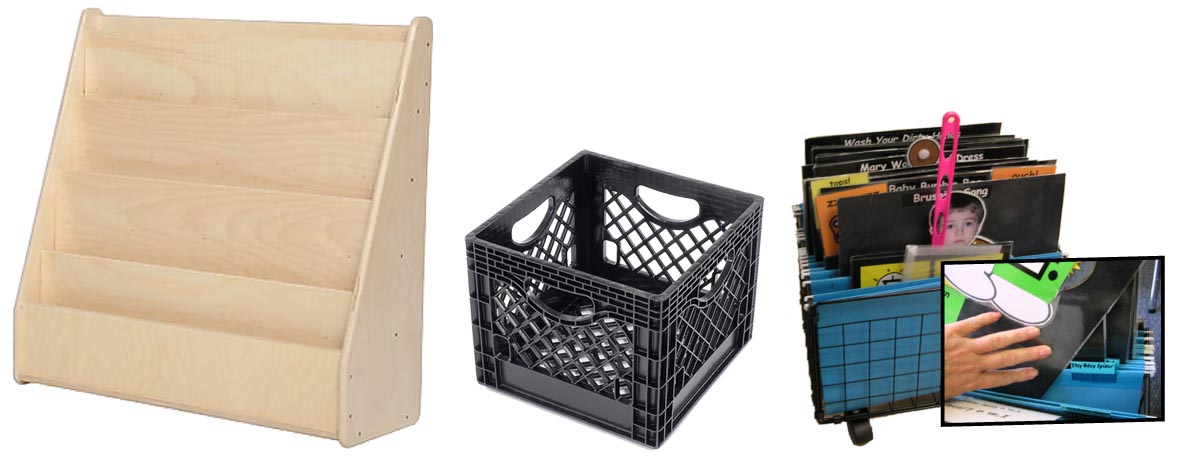
Organizing the Slot-Filler Symbols
Most Vest Displays incorporate Dual=Representation slot-filler symbols that are velcroed on or flipped within a symbol line. Store the slot-filler symbols and the time-dependent repetitive line(s) for each Vest Display in string envelopes that velcro to the back of the display. Ziploc® storage bags can be used as an inexpensive alternative. Now when I select a Vest Display, I am simultaneously selecting the additional materials that support that display. As an aside, I usually glue a print out of the Song Text (with information re: implementation) on the back of the base display before laminating. The detachable string envelopes are velcroed over the song text.
Figure 11: Using String Envelopes to Store Loose Symbols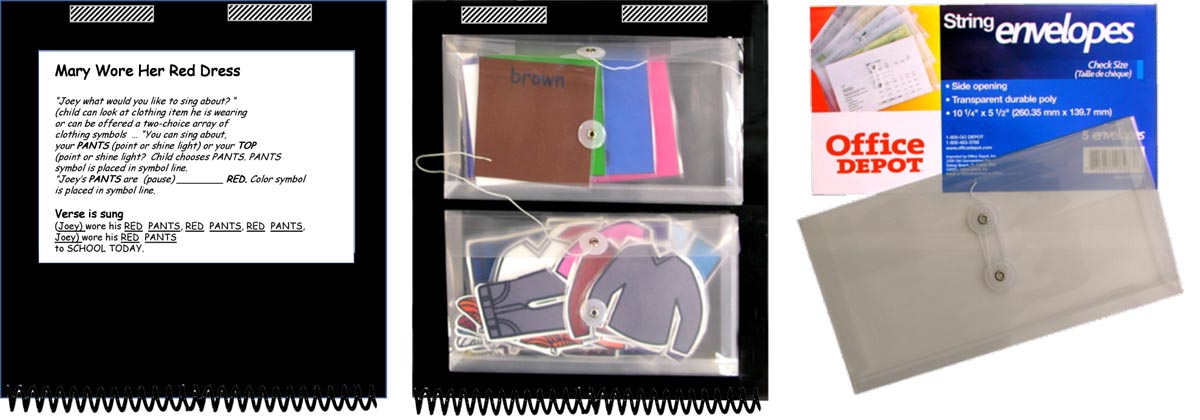
Organizing the Song/Verse Choices
The web offers a host of velcro-receptive options that are perfect for organizing the song’s detachable symbols on one side, while reserving the opposite side for displaying song/verse choices.
Figure 12: Velcro-Receptive Products for Organizing Materials
Storage clipboards also offer an efficient option for storing and displaying song choice symbols. The inside of the storage clipboard can be lined with strips of adhesive loop velcro or Tempo Display Loop Fabric (a velcro-receptive fabric), while a strip of adhesive loop velcro or indoor-outdoor (looped carpet) is adhered to the outside of the storage clipboard to display your choice array (e.g. field of two, three or four choices). Storage clipboards vary in their thickness. If you are using tangible objects to represent your song choices, choose a thicker storage clipboard that offers more room for accommodating your tangible objects.
Figure 13: Adapting a Storage Clipboard to Accommodate Song Choices
If your budget is more limited, consider covering a lightweight board (I found my 9″ X 12″ board in the art section of Michael’s) with indoor-outdoor carpet on one side and a velcro strip on the flip side. The symbols are stored on the carpet side; the field of choice (field of 2, 3 or 4 depending upon need) is set up on the flip side of the board. This format works great for organizing your verse choices. First, you take the symbols out of their storage string envelope … quickly place them on the carpet side of the board … use the flip side of the board to set up and offer a choice array.
Figure 14: The ‘Carpet Square’ Option
Depending upon the needs of your students, you may also consider offering choices on a communication device such as the TechTalk (AMDI) or on your classroom iPad or Android tablet. You may wish to include some additional symbols for nurturing two- and three-symbol messages. PowerPoint can be used to create this song choice page, which is displayed on a tablet using the Microsoft PowerPoint App (available in both Mac & Windows versions). You can download a free PowerPoint Song Launch Template from Teachers Pay Teachers. Audacity, a free audio editing resource, can be used to program the song labels into the template. Audacity allows you to convert your adult voice recording into a ‘child voice’. For more information on using Audacity to create a ‘child voice’ please refer to the following blog post.
Figure 15: Using the iPad to Offer Choices

General Guidelines for Using Vest Displays
- Use a slow pace when singing songs. This slow pace gives you more time to manipulate the materials and point to the symbols as you sing. It also gives your students more time to focus on the symbols and process the auditory input that is being provided in conjunction with your Aided Language Stimulation.
- Make sure there is a one-to-one correspondence between what you are saying and the symbols to which you are pointing. Make your pointing very deliberate.
- Be sure to strike a balance between looking at the Vest Display and making eye contact with your students. Your Vest Display agenda should always reflect an enjoyable and meaningful social interaction.
- Many components of the vest display are detachable (e.g., manipulatives, Dual=Rep symbols) allowing you to place the item directly in a child’s field of gaze. Although you might initially need to use this more overt strategy with some students, with time many students learn to shift their gaze to look at an item being shown to the group. Detachable components can also promote greater audience participation by giving children an opportunity to manipulate materials, e.g., adding the red pants manipulative to the detachable body of the Mary Wore Her Red Dress Vest Display.
- When discussing symbol choices, always share the choice array, first with the group then with the target child. This allows each choice-making event to be beneficial for the entire group and helps to keep the non-target students more engaged (even when it’s not their turn). When discussing the choices, always start with the highest level of representation and then flip to reveal the lower level of representation (e.g. Printed Word then Picture Symbol or Picture Symbol then Photo). This strategy ensures children are exposed to the level of representation, appropriate to their needs while still being stimulated with a higher level of representation. If the group is ‘cognitively young’ you may prefer to offer choices using tangible objects, e.g., a little rubber ducky is used to represent 5 Little Ducks; a little plastic frog denotes the song, 5 Green and Speckled Frogs.
- Implement strategies for maintaining engagement while you are setting up for a song. For example, you might hum the tune for the next song while looking for the Vest Display or you might provide verbal commentary as you arrange your materials on a carpet square, e.g., “Oh look I found the WIPERS (show) … and move on back … here’s that DRIVER (show) … ” These strategies help to minimize the ‘deadly down time’ that can cause your Circle Time to unravel into chaos.
- The manipulatives can be used to enhance audience participation and engagement. Some songs are amenable to assigning manipulatives to students at the beginning of the song, e.g., Down on Grandpa’s Farm. Children listen for their assigned animal, at which point they are invited to match their animal to the corresponding animal in the scene of the Vest Display.
Figure 16: Promoting Audience Participation
‘Counting songs’ lend themselves to distributing the manipulatives as you go, e.g., 5 Little Ducks, 6 Little Monkeys Jumping on the Bed. At the end of the song, you can ‘call in’ the animals by number or color, “ WHEN the MAMA DUCK SAID … QUACK, QUACK, QUACK …all the LITTLE DUCKS CAME a WADDLING BACK. Duckie number 1 … (WHERE) (ARE) (YOU) (Core Facilitator Board)? ”
“WHO has the monkey wearing pink?
Several Vest Displays are available for purchase through Teachers Pay Teachers (here).
A resource called, Guidelines for Constructing Vest Displays is also available and includes a basic template for using PowerPoint to render your own song favorites into a Vest Display format. You can find that here.
In summary, the Vest Display format is a great fit for preschool children functioning on the Autism Spectrum. It provides a ‘curb cut’ for joint attention skills and offers a wonderful forum for addressing a broad range of academic and communication skills.
Equally important, Vest Displays are as much fun for staff … as they are for students.
Additional Resources:
- http://www.mayer-johnson.com/multipurpose-fabric-easel
- http://www.nationalautismresources.com/portable-communication-folder.html
- http://www.nationalautismresources.com/pecs-communication-notebook.html
:::::::::::::::::::::::::::::::::::::::::::::::::::::::::::::::::::::::::::::
You can see a previous post by Dr. Goossens’ on cooking in the classroom here.
Filed under: Featured Posts, PrAACtical Thinking
Tagged With: Carol Goossens', communication displays, no tech, preschool, visual supports
This post was written by Carole Zangari

