How I Do It: Marlene Cummings on Strengthening the Communication Environment
Marlene Cummings is back to share some thoughts on creating communication-friendly environments. As an AAC consultant to the Oakland Schools, Marlene gets to support AAC implementation in a variety of classrooms with all types of learners. You can read her earlier posts here and here.
:::::::::::::::::::::::::::::::::::::::::::::::::::::::::::::::::::::::::::::::::::::::::::::::::::::::::::::::::::::::::::::::::::::::::::::::::::::::::
5 Things to Consider in the “Communication Environment”
The first thing we want to ask: Is language being represented visibly?
We in AAC are often known by our “stuff”. Because we need to represent language visibly and love technology, we typically have a lot of “stuff”. I, for one, currently have a large storage unit holding 30+ years of “stuff” waiting to be distributed to all my new teams since I am no longer in the classroom.
Let’s start by looking around our instructional environment. It is our intention to model the use of language being represented visibly and to provide the vocabulary and opportunities for students to see, hear and understand language. We intend for our students to be able to use language to communicate what they are thinking, feeling, and observing.
Look around your communication environment. What do you SEE?
1. Instructional Environment
Where would you find evidence of embedded AAC supports and systems?
- Student goals
- Lesson plans
- Classroom design
- Daily classroom schedule
- Communication
- Newsletters
- Classroom blog
- Classroom website
- Family Handbook
What would your instructional tools look like? How would the focus on teaching vocabulary and language be represented? Here is one example.
The team who created this tool shared these thoughts with me: “This is a way for us to organize all of our learning and ensure that we are moving forward with AAC and our curriculum together. Word wall words and communication phrases will be added weekly, while feelings will be set for a one month period. When the phrases or words have been introduced they will
be listed in black. New words and phrases will be in green. This document will grow as the year progresses and will list all learning by the end.”
The exciting part for me in this process was to sit in a room and watch this team, SLP, 2 ASD Teachers, and School Social Worker create this plan, blend their energies and goals and then design a organizational format to implement it in about 30 minutes. At one point they were all talking over each other as they saw the potential of the work and what it could mean for their students and for them. They then began imagining how the OT and PT would fit into the plan and the communication opportunities available when they instruct the students. IT WAS ENERGIZING!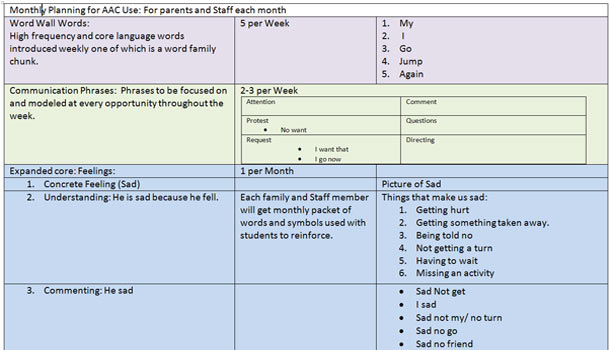
2. Core Vocabulary
What actions have you taken to support “core vocabulary” in your classroom environment?
- You have thoughtfully chosen the core vocabulary you will be using.
- You have embedded core into your lessons plans and student goals.
- You have made “core” available (See core vocabulary posts from Praactical AAC)
One team decided to start with the “help” symbol. They placed it everywhere and began to explicitly teach and model its use. The team describes their strategy: “when a child needs help an adult models by pointing to and/or pulling off the symbol and giving it to an adult or peer” and their reflection: “this has really been an incredible and simple way to 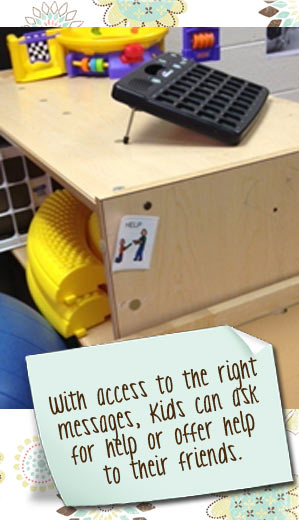 introduce core to our very young students just entering our program. The students have not only used the symbol to ask for help but also to offer help to their peers.” These are 3-5 year olds. Now that’s exciting!
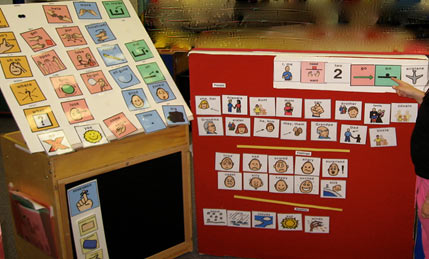
This same team is finding success by placing core vocabulary around the classroom for instruction and modeling. They willingly shared their photos and purposes.
- A laminated core vocabulary display placed on classroom tabletops allowing adult modeling and student use.
- An interactive core vocabulary display for manual phrase building by adults and students. It also serves as a modeling tool for communication exchanges when students are using their own AAC systems.
- A laminated core vocabulary display placed at child level in “circle time” area to support vocabulary instruction and modeling. It quickly became a student communication system with phrases like “I want that”, “my turn”, or “I want turn” being student generated independently. The SLP loudly declares: “I LOVE having this at “circle time.”
- A “Circle Time” flipbook designed with strategically chosen fringe vocabulary pages available to each student. The classroom core vocabulary display is the books cover with additional fringe pages including calendar, weekdays, colors, shapes, weather and the alphabet.
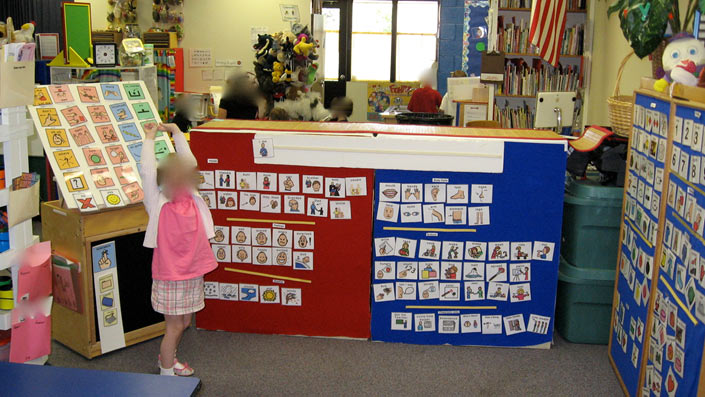
Here you see almost life size “Core” allowing students to manipulate language throughout the day with a variety of carefully chosen fringe vocabulary. The classroom becomes the AAC System.
3. Modeling: The 3 second rule.
Anyone who has worked in classrooms knows that before we begin an instructional activity we make sure we have tools we need for the activity. This also applies to “AAC tools for communication”. Running classrooms for 30+ years has heightened my awareness to keep “communication” on the radar as we go through the days and weeks of classroom life.
It is important to be able to model the language as the opportunity unfolds. A student is attempting to communicate help. Their device is not charged, the Go Talk 32 is at the other center and my single core symbols are back at circle time. Now what?
Here are a few of those strategies:
- Keep a notepad in each instructional area. Write down things you wish you had at that moment that would have assisted you in modeling AAC, teaching a specific vocabulary word or giving opportunities for demonstrating the functions of communication. Whatever it was you attempted to do and could not because you lacked a symbol, a piece of tech etc. Several times a month collect that information. Look for similarities. See if there are things you could change that would have maximum impact across your instructional environment not necessarily topic or activity specific.
An example: One thing we did was hang a plastic folder in every instructional area filled with various sizes and configurations of our “core vocabulary.” We had big displays, small displays, single symbols in 2 and 5-inch sizes and cards with each word printed on it. This way, whenever we needed “core” it was at our fingertips.
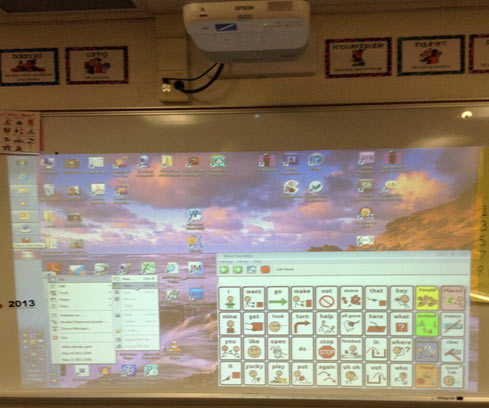
One WEPL team makes sure displays for “core” and activity based “fringe” are easily accessible; in folders, on the frig, on the smart board with Touch Chat Editor, in a Go Talk 32 Express and being worn.
4. Opportunities
When you are intentional in your instruction and have embedded visibly represented language into your day, it is a lot easier to see all the opportunities you can make available. Take another look at the “AAC Communication Opportunity Scale”.
Another strategy we used in the classroom was structured observation. We would take a copy of our initial core vocabulary and our Print-n-Communicate (our go to “fringe”) and observe several different instructional and leisure activities in 10-minute increments. As we observed we would check off how many times we could have used the core and available fringe words. We also made note if the necessary communication tools were available or not. We took that information and matched it up with our lesson plans to see times during the day we needed more opportunities and what barriers we could remove to make this happen.
Remember this is an unfolding process. Be kind to yourself. This is not accomplished in a day or a week or a year. The “monthly planning tool” shared earlier was created after two years of the team learning about AAC, exploring core, getting low and high tech devices in place for their students, initial augmentation of the classroom, monthly meetings to deepen their learning and begin implementation. Then they began the next step.
5. Access all day long
Remember our goal is to give our AAC communicators the opportunity to hear, see, manipulate and express language in every way possible, as often as possible with as much impact as possible as soon as possible.
- Inundate the communication environment with vocabulary, starting with core.
- Consider your entire learning environment your fringe vocabulary. Don’t just limit it to what you have programmed into the communication system.
- Allow communication to be modeled and used by as many staff and students as possible, which more naturally represent what our verbal communicators experience in their “world of communication”.
Just for fun see how many of your staff could take a blank communication display and fill it in with your chosen core vocabulary.
Knowing the vocabulary available to your students changes everything. You know that feeling when you are attempting to model a visibly represented phrase for a student during an instructional activity and you have no idea what is in the device and even if you remember it’s in there, where in the world is it. In contrast, imagine the feeling when you get to model a phrase and you know the core, you know where the fringe is and you know the core phrases being targeted that week.
::::::::::::::::::::::::::::::::::::::::::::::::::::::::::::::::::::::::::::::::::::::::::::::::::::::::::::::::::::::::::::::::::::::::::::::::::::::::::::::
Stay tuned for more of Marlene’s ideas in her next post on how to tell when your students are becoming competent communicators.
Filed under: PrAACtical Thinking
Tagged With: 24/7, access, aided languagge input, classroom, core vocabulary, education, Marlene Cummings, modeling, opportunity
This post was written by Carole Zangari







1 Comment
Is Marlene Cummings willing to share a template of the lesson plan?
Thanks,
Kelli