5 Ways to Use Anchor Charts and Other Visual Supports for AAC Language Therapy
Anchor charts are a visual way to outline, describe, or illustrate a procedure, strategy, or concept. They are widely used visual supports in general education classrooms across the grade levels.
In AAC therapy, anchor charts offer several benefits. First, making the anchor chart forces us to distill the main ideas in whatever it is we are teaching. What are the key aspects of what we are teaching? We have to answer that to create our anchor chart, and that gets us really thinking about the concept/process/strategy in great detail. Selecting the critical elements for our anchor chart helps us focus on the constructs that are most important to teach.
Secondly, it helps us explain the concept/process/strategy in a more concise and articulate way. Putting things into writing forces us to clarify our explanations, and allows us to carefully consider what to say and how to say it. Yes, we sometimes wing it and that can be a beautiful thing. But with important material, it’s vital that we can explain things clearly and concisely. Some of you may be able to do this very well ‘on the fly.’ The rest of us, though, benefit from a little advance planning for our verbiage and an anchor chart creates the opportunity for us to do this and have a long-lasting visual support to use and re-use in future sessions.
Here are some prAACtical thoughts on making and using anchor charts.
1. Consider creating them for tricky concepts, multi-step processes, and content that you will add to over time. We’ve made and used these visual supports for a variety of things such as teaching about auxiliary verbs, self regulation, inferencing, and reducing ambiguity.
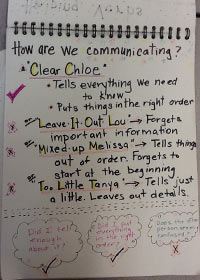
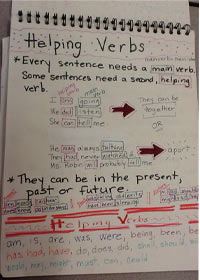
2. Create or expand them in partnership with your learners. Involving the learner in developing the anchor chart is a good way to build conceptual knowledge and buy-in at the same time. As we’re talking about the concept, our learner can contribute their ideas for the anchor chart. It’s a great way for us to take the ‘think aloud’ strategy that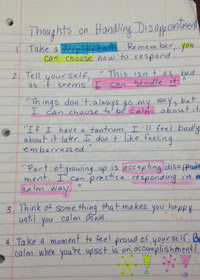 we often use, and record those ideas for later referencing. It can help to write out the main ideas in narrative form first (such as the example here), then use that information to create the anchor chart. In this example, we worked together to create the steps for handling disappointment over a few sessions, adding information, revising our thoughts, and finally highlighting key concepts before turning it into an anchor chart.
3. Highlight key aspects of a concept before the lesson/sessions. Once the anchor chart has been created (or at least started), we can use it to preview the important concepts in whatever we are teaching in that session. Keep it easily accessible and use it to discuss the things you’ll be focusing on in that lesson.
4. Use the anchor chart reinforce correct responses. When the learner responds correctly, revisit the part of the anchor chart that relates to that concept. By looking back at the visual support to highlight what it was that made the correct answer right, we help the learner solidify their understanding of that concept.
5. Anchor charts are great tools for self-analysis. Once learners respond, we can have him/her evaluate their response in light of what is shown on the anchor chart. When I ask Timmy, “How does that fit with what we said about inferencing?” he can look to the visual support to compare his response to what the anchor chart says. Anytime we can help them evaluate their own utterances, we are closer to self-correction.
Do you use this form of visual support in your AAC work? We’d love to hear about it.
Filed under: PrAACtical Thinking
Tagged With: AAC intervention, anchor charts, implementation ideas, visual supports
This post was written by Carole Zangari


1 Comment
I use anchor charts for working on personal narratives a lot. Most of the classrooms I’m in use white boards, but they’re too easy to erase.